
How to make a registration page
LEARNING GOAL: knowing how to make your own registration page.
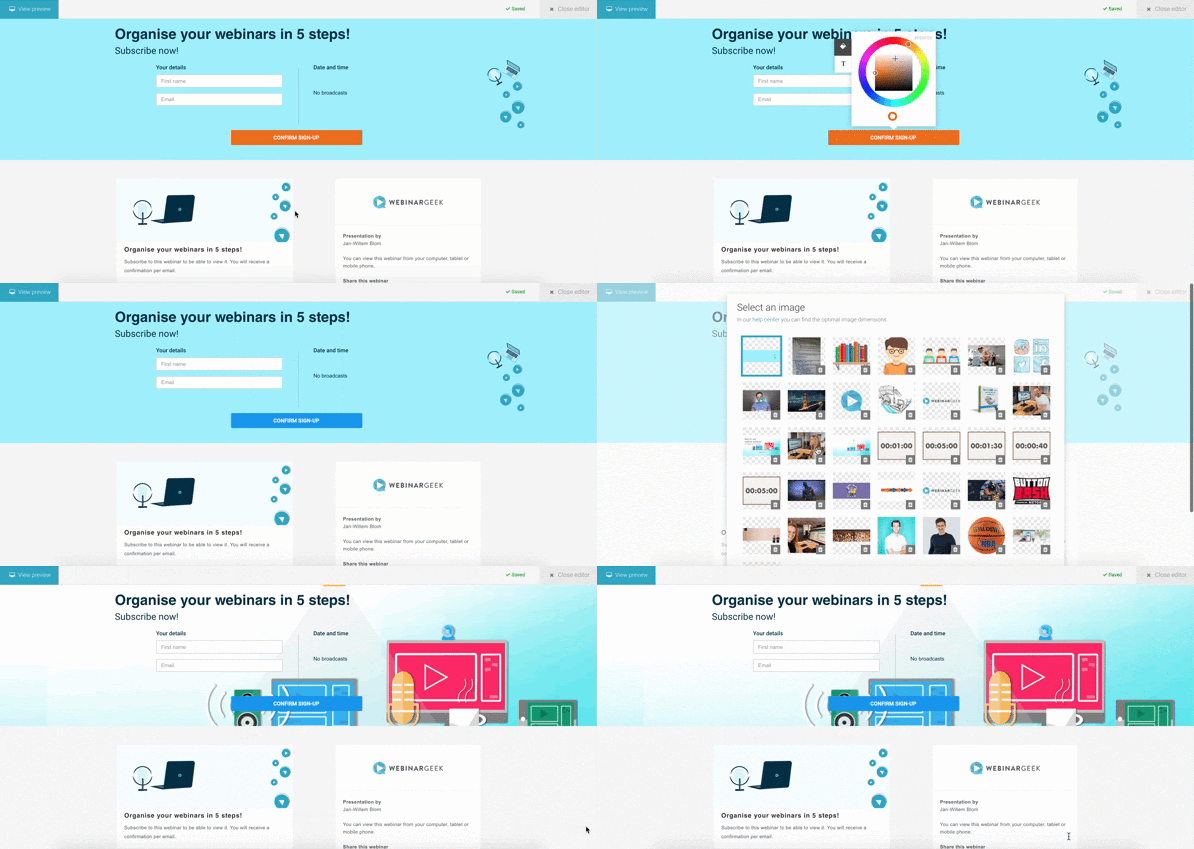
Before you can develop the registration process, you need to create the registration page. This is the first step after creating a new webinar. Here, we can edit the registration page.
If you click on ‘Edit registration page’, you can edit different parts of the registration page. We’ll discuss the editing options, one by one.
Title
The title could very well be the most important part of the registration page. It consists of one or sometimes two lines of text, which you use to draw the potential registrant’s attention. The title is short and to the point and states what the webinar is about. You want to move visitors of the page to act. That’s why a clear call to action is important to create a high level of engagement.
In the next chapter, we’ll discuss what you can do to optimize the title. For now, here are some practical tips:
Use numbers, if possible
Do not use language that's too complicated
Try to evoke emotions Create a title that appeals to people
Description
Describe what the webinar is about in more detail. You can also grab this opportunity to elaborate on the title. Make sure that, like the title, the description is short and to the point. The purpose of the description is to inform the potential viewer about the webinar’s benefits and added value. But we don’t want to give away too much information just yet.
You can use bullet points and 3 to 4 lines for your description. Here’s an example:
Learn everything about webinars in 30 minutes
How we use webinars to generate more leads
+ 10 useful tips you need to organize successful webinars
Keep in mind that a shorter list is easier to read.
Call to action
The call to action is an important part of the registration page. It refers to the button that moves visitors to action, which is to register for the webinar. The only call to action on the page is the one that lets people register.
Make sure the call to action is obvious
Use striking colors
Don’t use too much text, use one to two words: ‘REGISTER NOW’
Registration fields
The registration fields are used to collect information about a registrant. The registration template already contains fields for a first name and an email address. The first name is used to address the registrant and the email address is used for communicative purposes.
You can decide which fields registrants have to fill in, for example, last name, company name, and phone number. Make sure that you limit the number of fields in order to keep registration easy and low-threshold. Do you want to add more fields? Then mark these as optional.
If you want to divide leads into groups and address them in different ways, it can be useful to add more fields.
You can also use the registration form to let registrants ask a question in advance and make them feel more involved. This can also be beneficial for you because the input gives you an idea of what the registrants think and you can respond to it during the webinar.
Visual aspects
The best way to give your registration page a personal touch is to add images and videos. What’s more, is that videos provide a unique way to let registrants meet you as a presenter in a video message.
Use the video to give a short description of the webinar. Explain the benefits and what viewers learn when they participate. Video tips:
No longer than 30 seconds
Keep it simple
Don’t use technical terms
Whether you use the standard registration page or want to adjust the page yourself, these are the most important elements that you should take into account when creating a successful registration page.
What have I learned?
What a registration page is
How I can make my own registration page
What I should take into account when I’m creating a registration page
Próximos cursos

Scale your lead generation funnel by WebinarGeek
WebinarGeek shares their expertise on using the power of webinars for lead generation.

5 Camera Tips for your Webinar
Discover 5 expert camera tips to improve webinar video quality. Boost your on-screen presence with better lighting, angles, and framing for more engaging online presentations.

Create a Live Webinar
Take your live webinars to the next level with our step-by-step checklist!

The Ultimate Camera Switcher: Atem Mini
Explore how the Atem Mini, an versatile camera switcher, can revolutionize your webinars with its easy-to-use interface, multiple input options, and professional-grade features. Perfect for anyone looking to enhance their live streaming setup.
Create an on-demand Webinar
Discover the power of convenience with our step-by-step checklist.

Zapier - Integrate with 6,000+ apps
Automate workflows to host webinars more effectively and efficiently.

Create a live webinar
Create a webinar easily and quickly with the webinar wizard from WebinarGeek. Organize a webinar with ease!

Optimize your webcam with OBS - part 1
Enhance your webinar's visual appeal! Learn to optimize your webcam image using OBS. Brightness, contrast, saturation, sharpness—master these settings for a captivating presentation.

How to stream webinars with vMix part 3
Complete your vMix journey in the final part of our series! Explore titles, overlays, configure vMix with WebinarGeek, and discover how to record your streams. Elevate your streaming game and unleash your creativity with vMix.

Automate workflows with HubSpot
The HubSpot integration is one of a kind, because it works both ways. This is how to automate your marketing.