
Get to know the interactions
Learning goal: add interactions to your webinar
Within WebinarGeek you have the possibility to use different interactions for your webinar. The most valuable features of a webinar are the possibilities to interact with your audience and collect valuable information about your leads.
In this course, we show step by step how you can use different interactions to become "more successful" when giving webinars.
Make your first call to action
Go to interactions and click on create interaction at the top right. You can format and adjust the call-to-action by clicking on the text boxes.
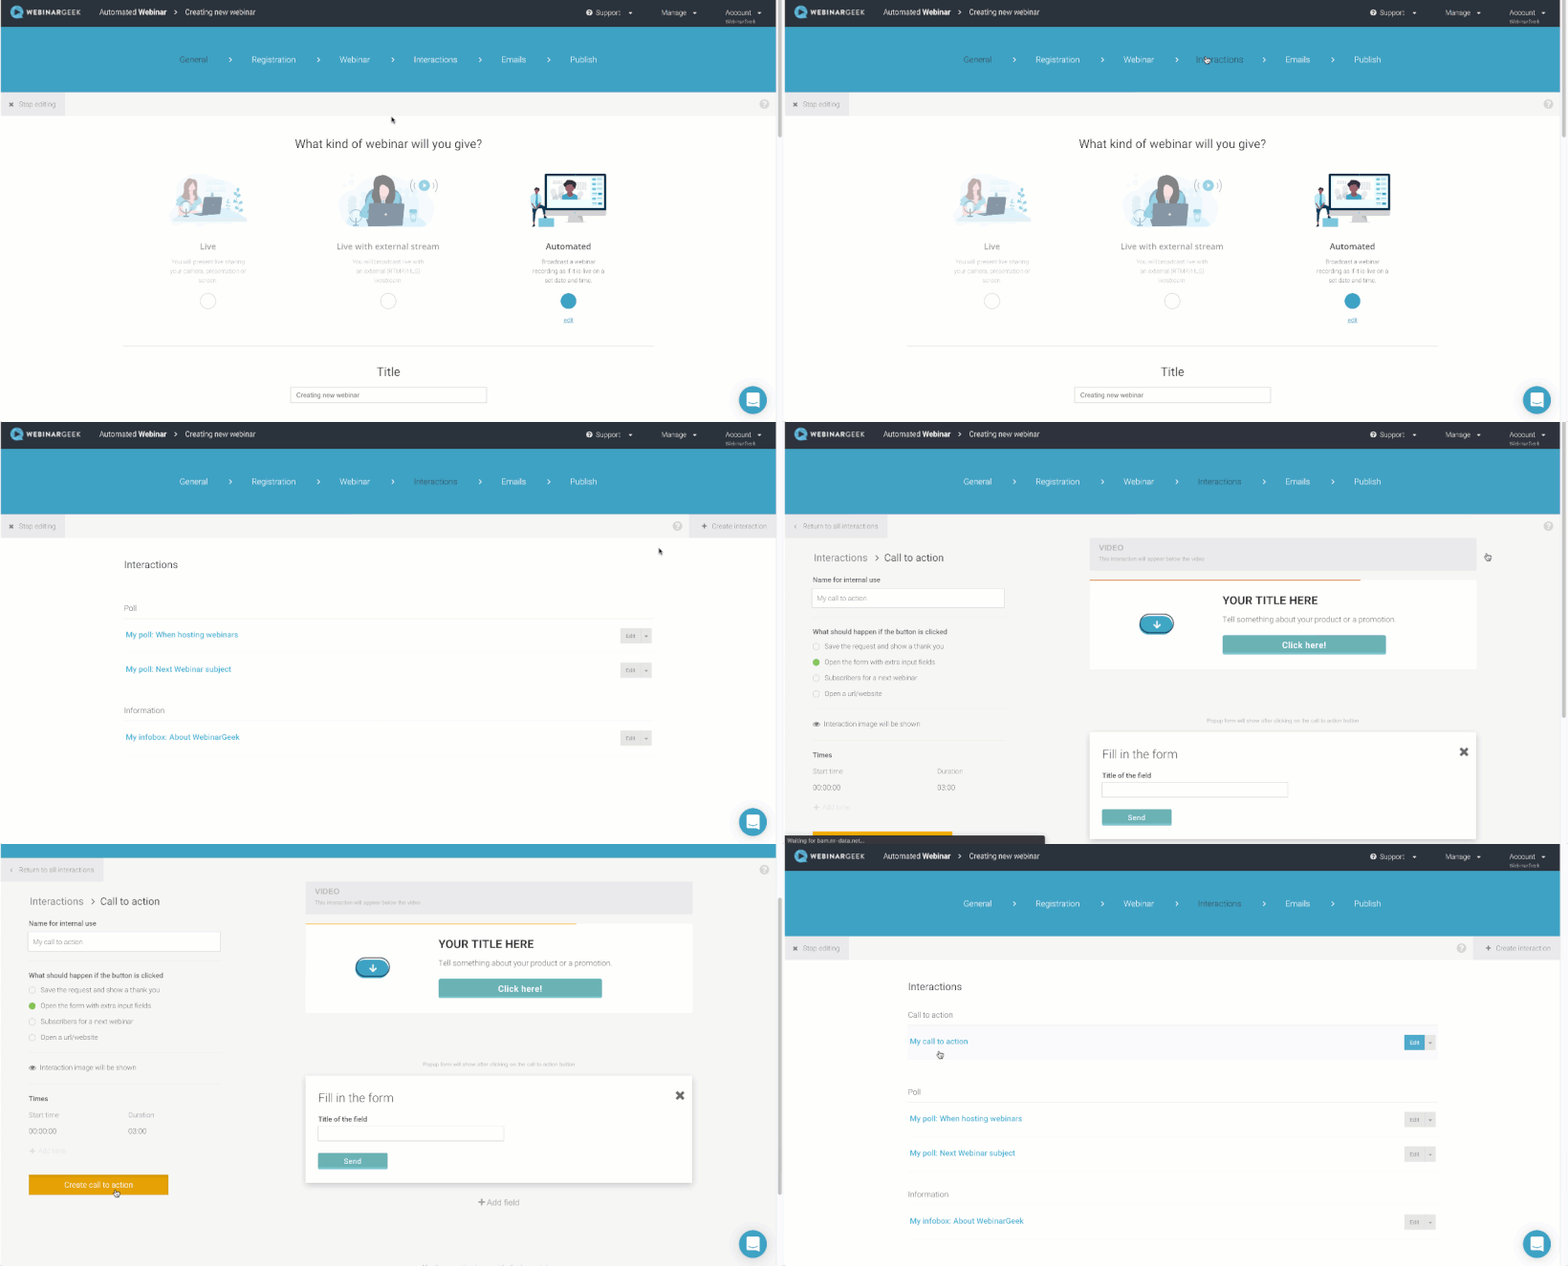
With a call to action, you make it possible to give a follow-up to your webinar. You can use the call to action in the following ways:
Record request: for your product or service
Gather more information: by adding a form with extra entry fields after the call to action
Register for the next webinar: encourage the viewer to also participate in the next webinar
Open URL/website: to your own website
In addition, it is important when you want to display the call-to-action:
Start time: when the interaction must be shown during the webinar.
Duration: the number of minutes that the interaction must remain visible.
Note: do not show your interaction too late during the webinar and do not show the interaction briefly. Give the viewer time to take action!
You can also make multiple call-to-actions during your webinar. For example, start with an interaction where you can gain more information from the viewer and end with an interaction where the viewer can proceed to purchase after the webinar.
After creating a call to action, do not forget to save it by pressing the yellow button "Create call to action".
Create your first Poll
A poll is a fantastic way to gauge the opinion of your viewers in an easily accessible way. For example, ask at what frequency they want you to give a webinar or which topic the next webinar should be about? You can continue endlessly here. The nice thing about using a poll at WebinarGeek is that the result is also visible to the entire public. By making this visible and possibly discussing it, it again ensures interaction during the webinar!
Click on create interaction again and click on: poll. You can edit and adjust all fields again by clicking on the text boxes.
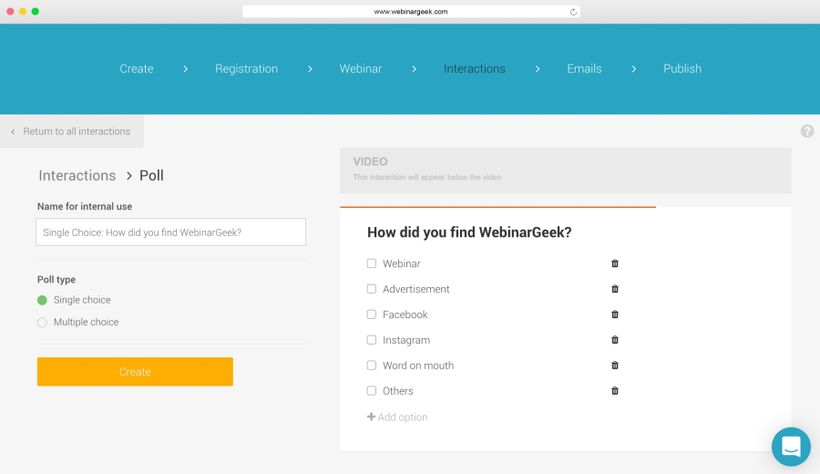
With a poll you should pay attention to the following points:
Don't make it too complicated.
Try to give a maximum of 5 to 6 answer options.
Don't make the answers look too similar.
Give the viewer time to read and answer the poll.
After creating a poll, don't forget to save it by clicking on the yellow button "Create poll".
Show extra information during your webinar
Showing extra information is a fantastic way to display information about your product or make a unique "temporary" offer during your webinar.
You can change the form in the same way as the other interaction modules. Use the following tips to create a good information interaction module:
Use a visually appealing image
Don't use too much text: try to describe your product/service or offer in one sentence
Keep it simple
Live chat
Perhaps the best interaction tool is the live chat. In the live chat, you have the option to interact with your audience. This can be done in two ways:
Public: everyone can participate and see the chat
Private: use a private chat for a one-on-one conversation
The public chat allows everyone to respond to each other's messages. In a private chat, only the presenter or moderator can see and respond to the chat.
Hint: you can use both private chat and public chat during the webinar.
Benefits of a private and public chat:
You give the viewer a choice
The private chat gives the possibility to ask a personal question
When it is busy, the private chat can offer a solution, so that questions are not overlooked
The private chat provides you with a clear overview of how to handle "important" questions with your audience during your webinar
Disadvantages of a public and private chat:
If you have many viewers, the public chat can become "chaotic"
If you only use private chat, you will miss part of the interaction with the audience
While making your webinar, you can already think carefully about your target group and what type of chat is most suitable for your target group. Of course, you can always choose to use both chat functions.
The sales page
The Sales Page is a page that becomes visible to viewers after the end of your webinar. Here you can tell something about your product/service and/or offer a unique offer.
A good sales page consists four important points:
Attention: grab the attention with an attractive title
Interest: awaken the interest with a short and powerful story
Desire: create a desire
Action: encourage action with a good and relative call-to-action
Hint: in general, sales pages are often long pages that contain a lot of information. If you have already introduced yourself to the viewer and the product or service during the webinar, you can make the sales page shorter. They already know you and are enthusiastic about you or your product. You do not need to rekindle the interest with an extensive sales page.
Edit the sales page
Click on the switch to enable the sales page. When you have turned on the sales page, it will be automatically displayed after you end your webinar, so you do not have to turn it on manually.
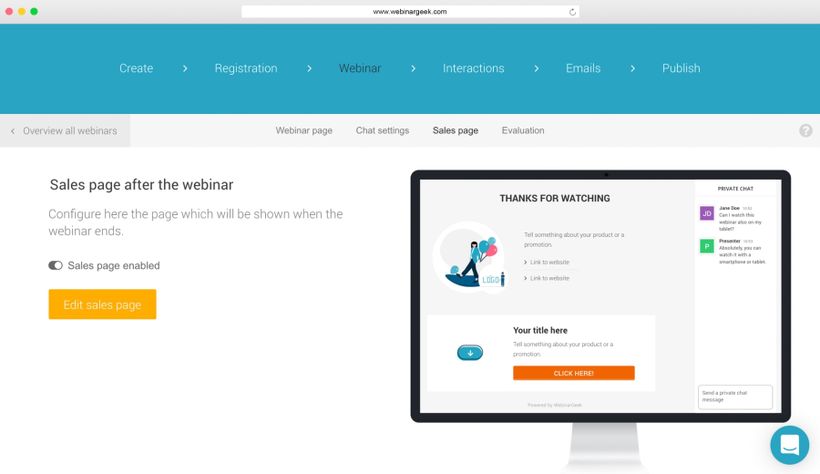
After you have switched on the sales page, you can edit it. Click on the orange "Edit Sales Page" button to go to the page editor. Here you can change the photos, add links and adjust everything to your own taste/style.
At last the evaluation form
You can also use an evaluation form. This will appear as a pop-up over your sales page with, for example, the question if your viewer let you know what he thought of the webinar. You can take this extra information with you to the next webinar. You can find the feedback on the evaluation form in your statistics under the heading "Evaluations."
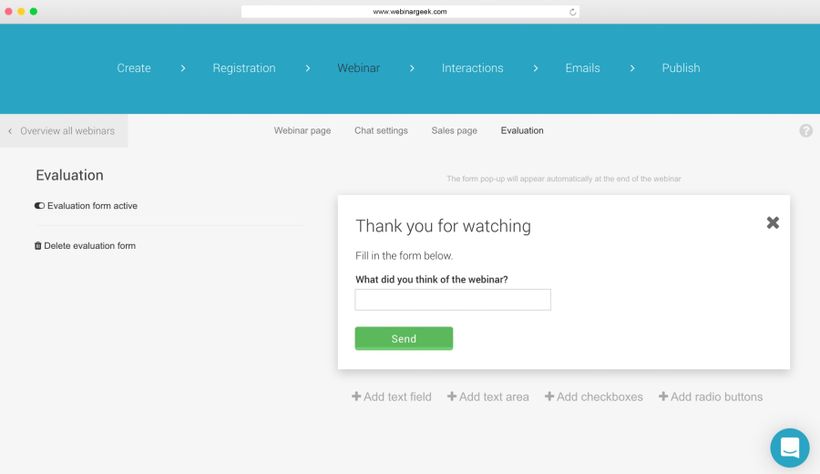
The advantage of an evaluation form:
You can receive feedback almost immediately after the webinar
You can take this feedback directly for the next webinar
You can also use the evaluation form to find out what the next webinar should be about
The interactions will be explained in detail in future courses, but we hope you have already helped a lot with this introduction about the interactions!
What did I learn?
What interaction options there are
How you can add the interactions
What to look out for when creating interactions
Próximos cursos

Create a webinar for online training
Engage, challenge, and assess your viewers with these features

Registration process from A to Z
Create a successful webinar by setting up the registration process in the right way

Manage data with Salesforce by MarTech Do
The Salesforce ecosystem enables clients to use the full potential of CRM systems for marketing and sales excellence.

Optimize your webcam with OBS part 2
Elevate your webcam image quality with OBS! Learn to tweak settings like white balance, gamma, and more for a professional look.

Building a Successful Webinar Channel for Recurring Content
Setup your channel, manage recurring webinars, and promote your content to grow your audience.

Masterclass: Best Automated Webinar Funnel
Learn how to build the best automated webinar funnel. Enroll in the WebinarGeek Masterclass and become an expert now!
Webinars as a side hustle
Ready for a rewarding side hustle? Discover how to profit from on-demand webinars. Learn to identify your expertise, create compelling content, promote effectively, and activate payments. Your success awaits!

E-mails
Share your message with different types of webinar emails. Turn your viewers into customers with automated follow-up emails!

Email and webinar marketing by MailBlue
MailBlue, official ActiveCampaign reseller, explores the connection between webinars and email marketing.

Webinar Playbook for Coaches
A practical guide for coaches who want to grow without limitations on your way. This playbook skips the generic pep talks and gets straight to the good stuff: how real coaches are using webinars to teach more people, save hours, and stay personal in the process.