5 Camera tips for your webinar
Pam
31 July 2024 - 8 min
On our YouTube channel, we’ve shared various tips for setting up your webinar camera. In this blog post, we will look at five tips to improve your webinar camera setup.
1. The rule of thirds
The first tip is the rule of thirds, a guideline used in visual arts like design, film, and video. It involves dividing your composition into nine equal parts using two horizontal and two vertical lines.
To illustrate, Walter has kindly agreed to be our model. Here, you see nine squares with four dots at the intersections. These lines serve as guides for positioning your subject.
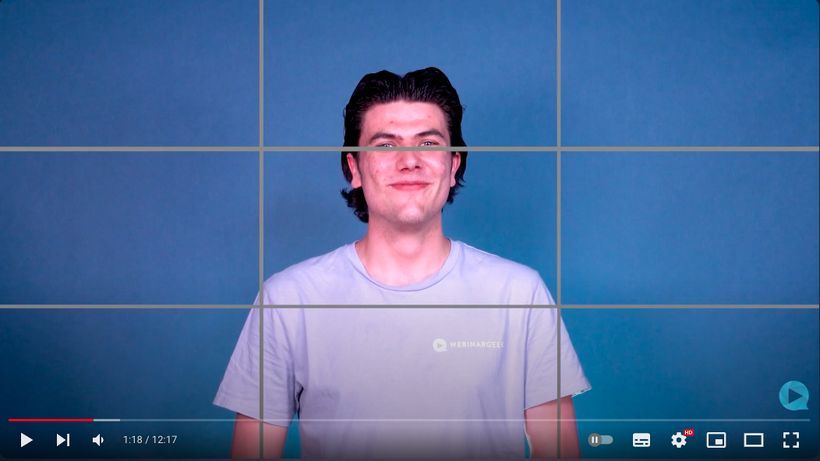
By placing Walter's eyes on the upper line and in the center, you ensure there is enough space above his head without zooming in too much. This technique creates a visually appealing and relaxed camera shot, free from awkward angles.
2. Framing
Framing refers to how large your subject appears relative to the background. Experiment with camera positions to try different perspectives like bird’s-eye or worm’s-eye views.
Bird’s-eye view: The camera looks down from a high angle.
Worm’s-eye view: The camera looks up from a low angle.
Also, consider how far the camera is zoomed in to create various shots:
Wide shot
Medium shot
Close-up
Extreme wide shot
Medium close-up
Detail shot
Portrait
For conveying intimate or emotional content, a close-up is ideal, while professional presentations benefit from a wider shot showing more of the body to convey authority.
3. Camera settings
Setting up your camera becomes easy once you are familiar with the three main adjustments: ISO, aperture, and shutter speed.
ISO: Stands for International Standardization Organization, indicating light sensitivity. A higher ISO increases sensitivity and captures more light, but when set too high an ISO can lead to grainy images.
Aperture: Similar to the iris of the human eye, the aperture controls light intake. A wider aperture captures more light, while a narrower one captures less.
Shutter speed: Also known as exposure time, it determines how long the camera sensor is exposed to light. Longer exposure times capture more light, which is useful for creative effects like light painting.
4. Sunlight
Sunlight can both enhance and hinder your recording. When used correctly, it can produce beautiful, cinematic effects. However, it can also cause issues like overexposure or silhouette effects. To manage sunlight effectively:
Avoid direct sunlight if possible.
Use window coverings to regulate indoor light.
5. Software
Use software tools like OBS to improve your camera performance. OBS allows easy adjustments to ISO, aperture, and other settings, and lets you resize your camera feed.
For those less technically inclined, the software offers a user-friendly solution to optimize your setup.
For a deeper understanding of using OBS, check out our videos on the topic.
Want to learn more about webinars, equipment, and the tech startup scene?
Subscribe to our channelRelated articles
Preventing and managing technical issues during your online event
Hosting online events can be exciting, but let’s face it: technical issues can sneak up on you, and that’s the last thing you want. So how can you prevent and manage those issues? In this blog, we’ll walk you through how to stay calm, focused, and professional while delivering a seamless experience for your audience.
The Ultimate Guide for the Best Tech Equipment to Host Webinars
Are you looking for a way to host professional-looking webinars without having to invest in an expensive webcam? This is how you can use your phone camera as a webcam.

Broadcast a webinar from your mobile phone
Gone are the days when you needed a fancy studio, high-end equipment, or even a desktop computer to host a webinar. Now, all you really need is your mobile phone! Yes, that little device in your pocket can do way more than just send texts or scroll through memes.