How to collect leads on Facebook
Matthias
03 December 2019 - 4 min

Facebook is one of the best social media platforms and a powerful platform to collect highly targeted leads with. But there’s a problem. Facebook doesn’t allow you to convert those leads through your own marketing channel. In this guide, we’ll show you step by step how to collect leads through Facebook that can be immediately registered in webinar software such as WebinarGeek.
Why generate leads through Facebook?
As an online marketer, I’ve learned a lot about Facebook these past few years. I can safely save I’ve developed a love-hate relationship with Facebook in that time. The social media channel is still one of the best sources to increase your social engagement. Furthermore, it’s an ever-evolving platform, which makes it a source of frustration for a lot of marketers like myself.
The development of the Facebook platform brings its own set of limitations, such as limited functionality, and (perhaps most importantly) you don’t own your own leads. It’s nothing short of a catastrophe when you spent all this time and effort creating valuable engagement, without the ability to target your own audience with remarketing or an email campaign. Fortunately, we found a solution to this problem at WebinarGeek. The one way to convert Facebook leads to useful information that will actually benefit your business!
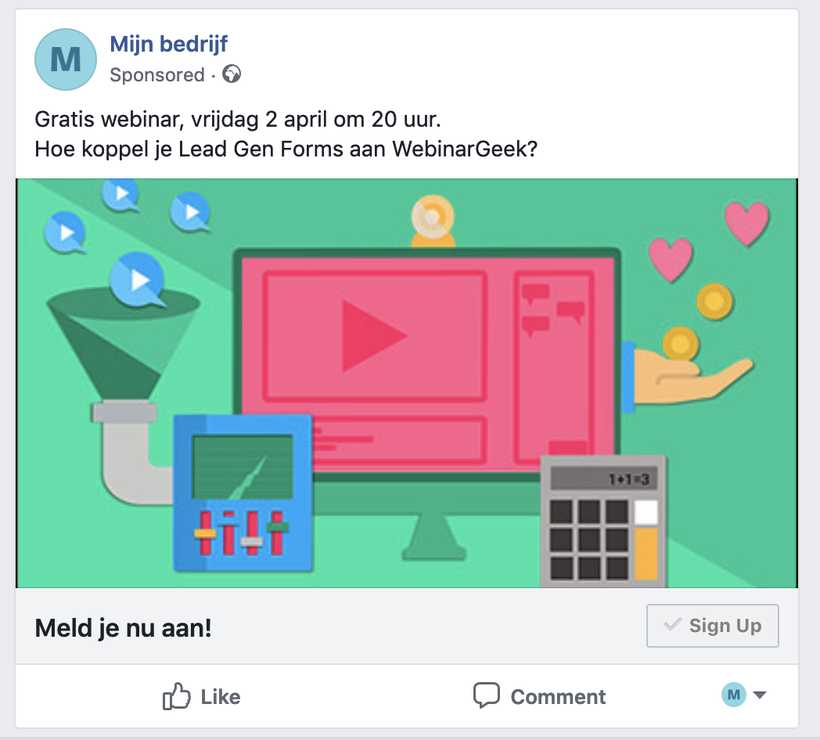
Increase your engagement
Start a webinar and promote it through Facebook to generate leads. This can be done in two ways: through your existing followers or using a paid strategy. In both cases, it’s absolutely key to collect contact data, like a name and email. With WebinarGeek you’re able to promote a webinar without much effort. You don’t even need to fill anything in or go to another website. You can directly create your ‘own’ leads through Facebook by combining the forces of WebinarGeek, Facebook Leads Gen Forms, and Zapier!
What do I need to collect leads directly through Facebook?
To immediately start collecting leads, you’ll need to following tools:
A WebinarGeek free trial account (After which you’ll need a premium account).
A Zapier starter subscription (Free 7 day trial).
A Facebook ad account (Free).
Tip: you can also apply this article to other platforms, such as Linkedin or HubSpot.
What is a Lead Gen Form?
Filling in forms is annoying. It’s a barrier to entry for most people. Not only can it be difficult to fill out this information on a mobile device, people simply don’t feel like doing it most of the time. Facebook Leads Gen Form makes the process of generating leads very simple. People click the ad, immediately opening a form. This form is already auto-filled with contact information that they previously shared on Facebook.
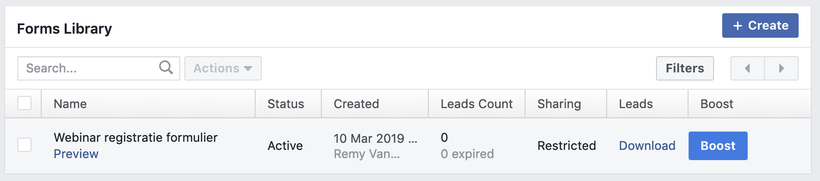
What does a Lead Gen Form look like?
Through Facebook, we create a Lead Form, which allows your leads to register for your webinar with just one click. You’re now actively collecting leads through Facebook!
What does a Lead Gen Form look like?
Through Facebook, we create a Lead Form, which allows your leads to register for your webinar with just one click. You’re now actively collecting leads through Facebook!
When someone clicks the 'Sign Up' button on the advert, the lead will be asked to confirm the information. This info has been auto-filled with Facebook account information previously provided by your lead.
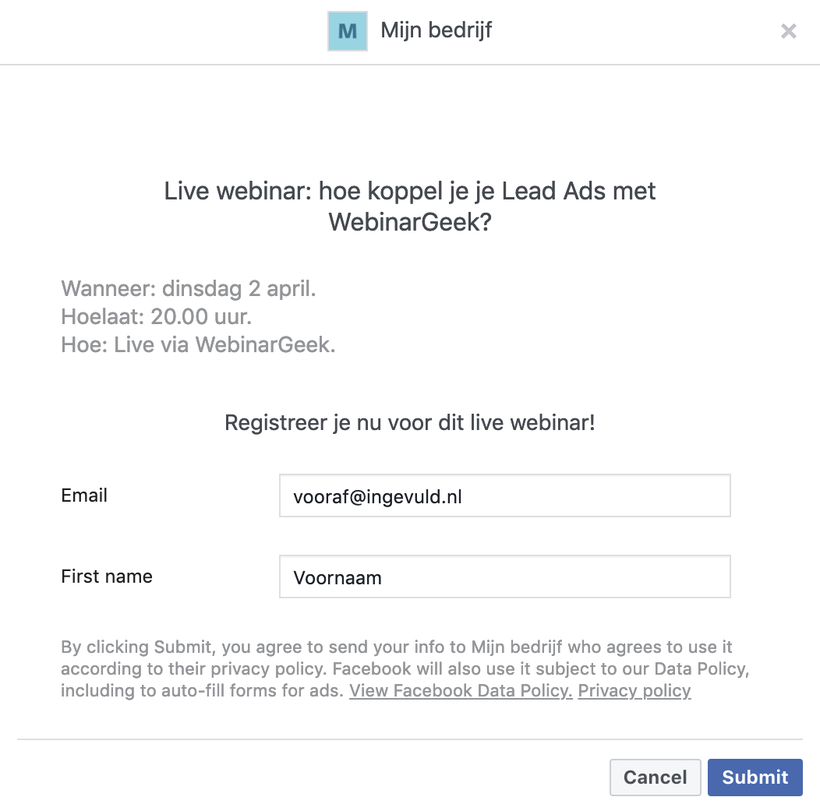
The only thing a potential lead needs to do now is clicking 'Submit'. All done! You just got yourself a new potential customer with a bunch of useful information related to the individual lead!
In the steps below, we’ll show you step-by-step how to configure the setup explained before.
Step 1. Create your own Lead Ad Form
We start by making a Lead Ad Form on Facebook. This is the form people can use to register for your webinar. Make sure to use the tips from this article for optimal results.
Open your Facebook business page or create one.
Click on ‘Publication Tools’ in the menu.
Click on ‘Forms for lead ads’ on the bottom left.
Click on '+Create' to generate a new form.
When you generated the form, the most important aspect is the type of information you’d like to collect. It’s also important to provide leads with the necessary information about the webinar itself. That’s why you should always create a catchy title with useful and practical information about the webinar.
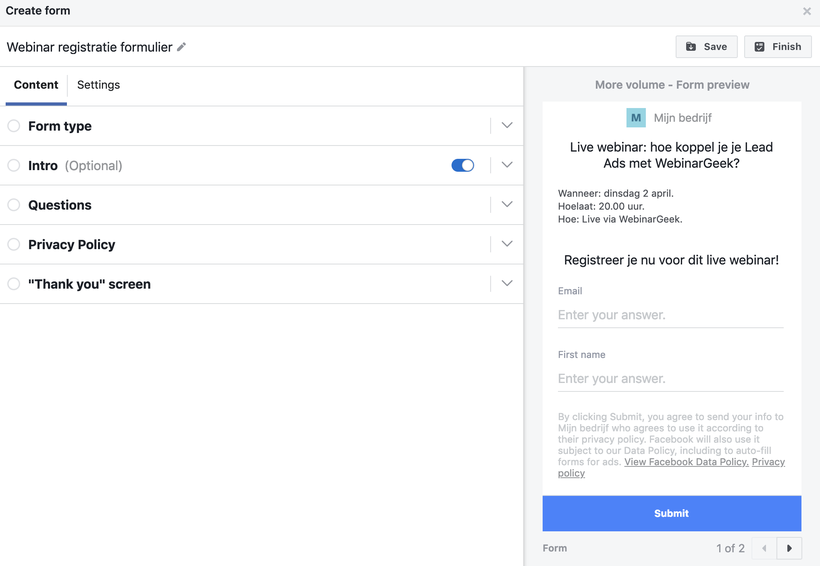
Fill in the information for the intro. It’s useful to display time and some information, and perhaps a little 'teaser' about the webinar itself. You can also connect a privacy policy and set your own Thank You page, which your leads will see after clicking on ‘Submit'.
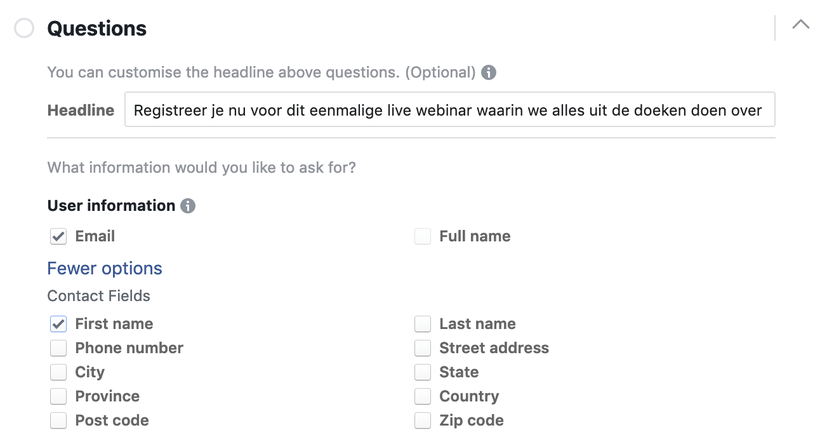
The most important part is the 'Questions'. This is where you collect the information you need for your registration. The minimum required fields will be 'Email' and 'First Name'. If you set your webinar to use surnames as well as a requirement for registration, you will have to show that field on your Facebook Lead Ad Form as well.
The potential lead only has to click on confirm/submit to register for your webinar. You’ll automatically collect all the information about the lead through the Lead Gen Form!
After this, you can click on '+Create' to actually generate the new Lead Gen Form.
Afterward, you have the ability to click on 'Preview' in the overview of created forms, in order to view an example of the actual form. It’s important to fill out the form yourself in order to test if everything works properly.
Step 2. Connect Zapier to WebinarGeek
Zapier is a web-based service that allows different applications to connect with one another. It allows you to connect WebinarGeek with more than 1000 other applications, such as Facebook.
First of all, it’s important to create a Zapier account, when you don’t already have one (It’s essential to use a paid Zapier subscription for the connection to work properly).
Step 3. Create your Zap
When you entered the Zapier environment, it’s time to create your first Zap. With the Zap, the data that’s being auto-filled in your Facebook Leads Ads Gen form will be sent to WebinarGeek.
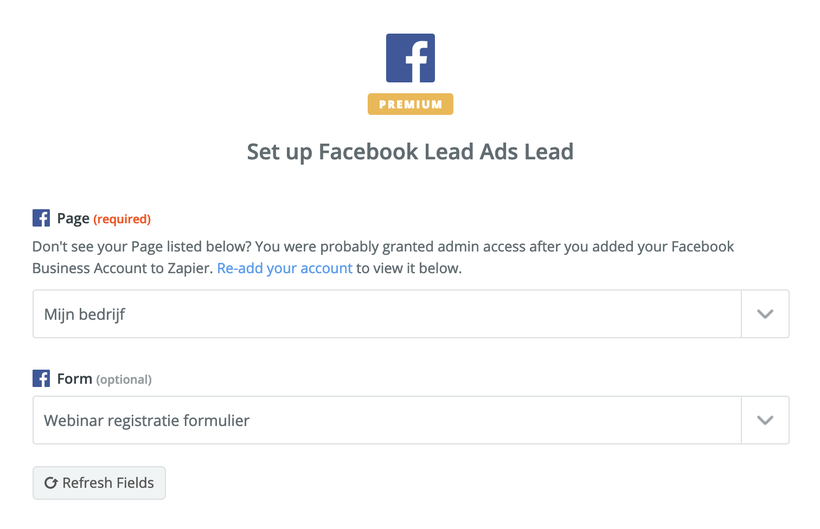
Choose the Facebook Leads Ads app at ‘Trigger’ and connect your Facebook account to Zapier. After the connection has been established, it’s time to determine which Page you’d like to connect to which Form:
After this, Zapier will fetch the example of the data we filled in in the previous step in the Facebook Lead Ad Form. When you managed to follow all the instructions (as explained in the previous step), you should see yourself registered for the webinar.
After setting your Facebook data, you have to create a new Action. Here, you should choose the WebinarGeek app. Now it’s time to connect your WebinarGeek account to Zapier using the instructions provided by Zapier.
When configuring the WebinarGeek Action, choose the webinar and the broadcast you’d like to register your leads for. Also, connect the fields from your Facebook Lead Ad Form to the corresponding fields in the WebinarGeek registration form, in this example: the email and firstname.
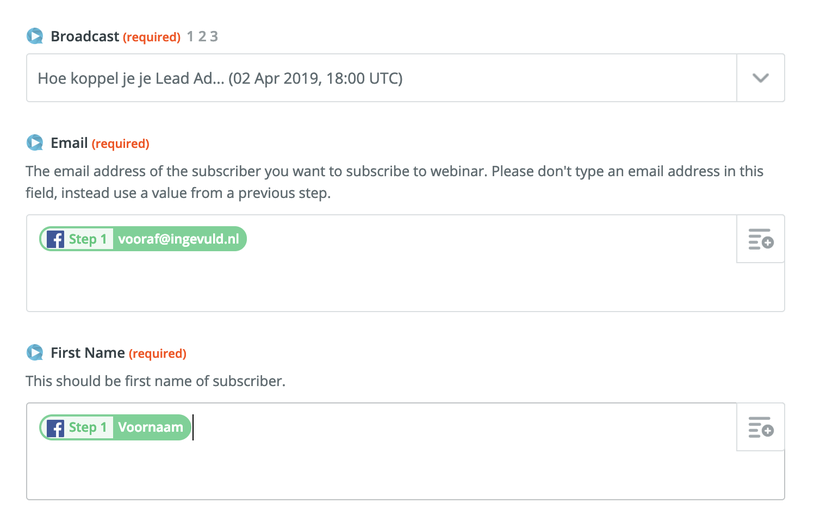
As you can see, the test information is being used from your own test registration. So we choose the webinar, an email, and the firstname. That’s all we need to activate the Zap!
Step 4. Test your flow
Before actually doing the Zap activation bits, it’s important to test the flow by sending a test registration to WebinarGeek. This is where we register you (as a test) for your webinar, so you’ve made sure the entire flow is tested properly and will actually work as intended.
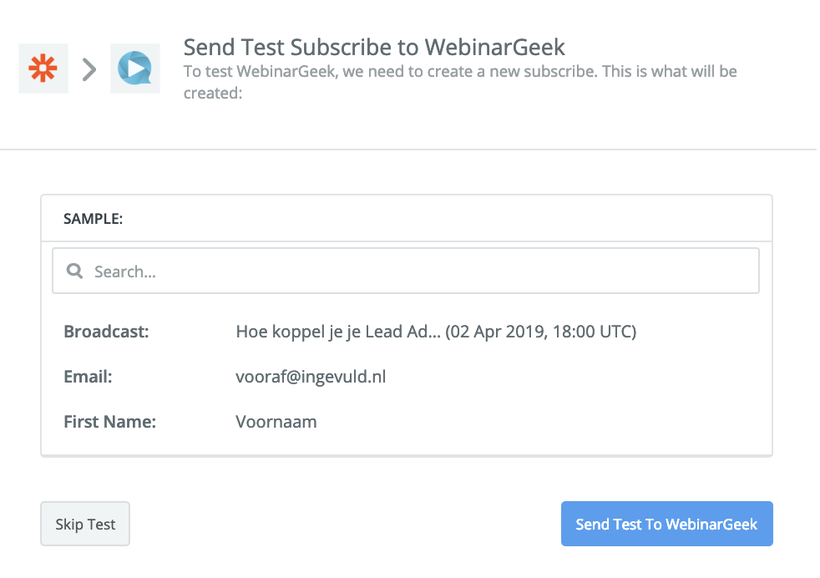
When you go to WebinarGeek now, you’ll see a new registration from the test we did. It should have entered your account through Zapier.

The flow works now! We can finally start making our Facebook ad in the next step.
Step 5. Create a Facebook ad
With paid ads from Facebook, you can narrow down your target audience very effectively. Are you already aware of your ideal audience using the characteristics below?
Location
Demographic
Current follows
Interests and behavior
If you already know, advertising with Facebook Business Manager seems like the job for you! It’s important to know your audience and specifically target those raving fans out there. This will improve your odds of lead conversion for the created ad.
From your Facebook Business Manager, you can create a 'lead generation' ad and apply your form to it. In the next article, we’ll explain exactly how to create a Facebook ad and how to target the right audience.
Download the whitepaper and get more valuable insights straight to your inbox!
Download whitepaper now!Related articles
How to Build a Webinar Strategy That Actually Converts (With Better CTAs)
Learn how to build a webinar strategy that actually converts using stronger webinar call-to-action examples, practical tips, and webinar statistics.
How to Improve Webinar Attendance Without Increasing Ad Spend
Learn how to improve webinar attendance without increasing ad spend by focusing on timing, intent, and what happens after registration.
HubSpot Webinar Integration Setup (2026 Guide)
This 2026 setup guide shows you how to connect WebinarGeek with HubSpot in just a few clicks. You’ll learn which data is worth syncing (and what to skip), plus how to set up a clean attendee vs no-show follow-up flow. The result is an organised CRM, reliable automation, and far less post-webinar busywork.